How to Add a User to Google Analytics Account? [Account Access Management]
- About Google Analytics
- About user access to Google Analytics
- How to add users to Google Analytics?
- How to remove users from Google Analytics?
- Conclusion
Add a user to Google Analytics: In the rapidly evolving digital landscape, understanding how visitors interact with your website is crucial for business success. Google Analytics is a powerful web analytics tool that provides comprehensive insights into website performance, user behavior, and marketing effectiveness.
What Is Google Analytics?
Google Analytics is a web analytics tool offered by Google that enables website owners and marketers to analyze and track various aspects of their website’s performance and user behavior.
By implementing a small tracking code on their website, users can gather valuable data and insights about how visitors interact with their site.

Key features of Google Analytics include:
- Website Traffic Analysis
- Audience Insights:
- Acquisition Channels
- Conversion Tracking
- Behavior Analysis etc.
Overall, Google Analytics equips businesses with robust insights for data-driven decision-making, website optimization, and improved online marketing strategies.
About User Access to Google Analytics
In the upcoming tutorial, we will explain the process of modifying user permissions.
However, it’s important to understand that the initial user roles assigned during the first step of adding a new user vary based on the location where you add them: Accounts, Properties, and Views.
For example, when adding a user through the Property Access Management section, their access will be limited to viewing or editing Properties and Views, excluding Accounts. This is because Accounts hold a higher position in the hierarchy compared to Properties, while Views have the lowest level of access.
If you want to know more about Google Ads extensions read this article on our blog.
5 Step Guide on How to Add a User to Google Analytics
Step 1
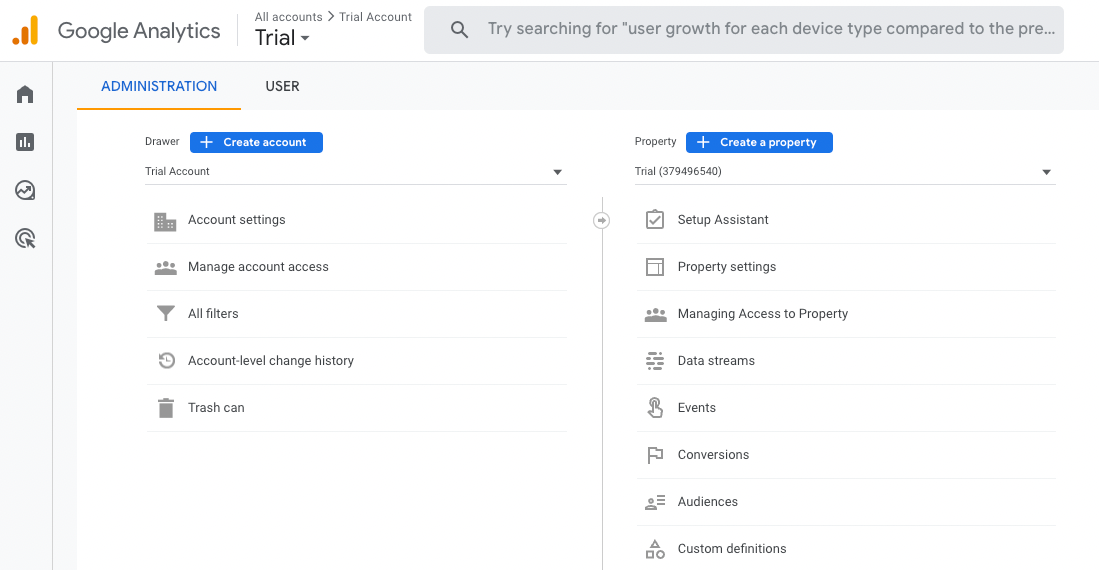
Locate and click on the “Admin” option positioned in the bottom-left corner of your Google Analytics account, accessible from any section within the platform.

Upon clicking on the “Admin” option, you will be presented with the Admin panel, which provides options for three levels: “Account”, “Property”, and “View”. Each of these levels includes an “Access Management” choice.
Choose the appropriate level, depending on the specific user you want to manage, and proceed accordingly.

Step 2
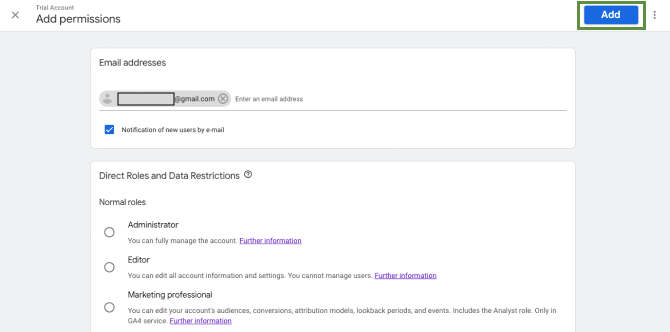
Within the Access Management module, you will find a list of existing users. To add a new user, locate and click the blue “+” button located in the upper-right corner of the page.
Upon clicking the blue “+” button, a menu will appear offering two options: “Add Users” and “Add User Groups”. For now select the first one from the menu and click on it. (If you wish to create user groups select the second option.)

Enter the email address of the prospective user or users into the “Email Addresses” field. You can add multiple email addresses in one batch by separating them with commas.
If you want to notify the newly added user(s) by email about the access granted, make sure to mark the checkbox below the email field that says “Notify New Users By Email.”

Step 3
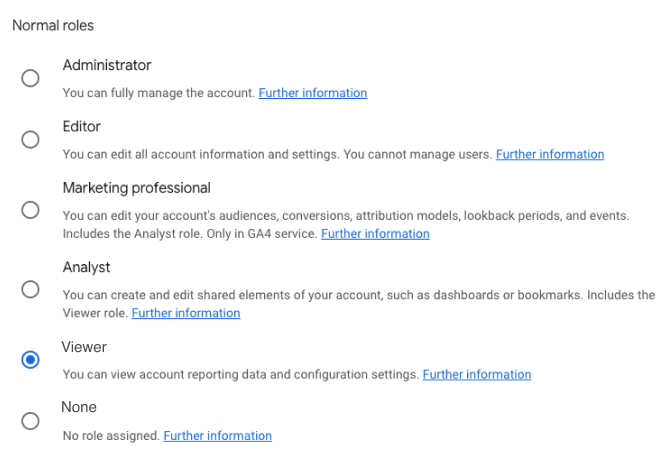
Scrolling down within the same module, you will come across a section labeled “Direct Roles and Data Restrictions.” In the “Standard Roles” subsection, you can choose a role from the provided list to assign to the user.
The available options are as follows:
- Administrator: Grants full control over the Google Analytics dashboard, encompassing the account, property, and view levels. Exercise caution when assigning this role and ensure it is given to trusted individuals.
- Editor: Allows the user to make edits to any aspect of the account, with the exception of user settings. Be mindful when assigning this role and consider the level of trust and responsibility.
- Marketing professional: You can edit your account’s audiences, conversions, attribution models, lookback periods, and events. Includes the Analyst role.
- Analyst: Similar to the Viewer role, but with additional capabilities to create and modify shared items such as dashboards.
- Viewer: Permits the user to view all settings and data associated with the account, without the ability to edit or share any content.
- None: This represents a role without any assigned abilities. It can be used for individuals you plan to add in the future, granting them access without specific permissions at present.
Choose the appropriate role from the list based on the user’s intended level of access and responsibilities.

Step 4
Continuing further down, you will encounter a section dedicated to “Data Restrictions.” This feature enables you to conceal more sensitive data from certain users. These include:
- Cost Metrics: With data restrictions applied, selected users will not have access to cost-related metrics.
- Revenue Metrics: Users subjected to data restrictions will be unable to view revenue-related metrics.
Be aware that granting someone an Administrator role empowers them to modify their own data restrictions, which may impact the level of access they have to sensitive data.

Step 5
After setting the desired roles and restrictions for the user, click on the “Add” button to finalize the process.
If you had previously checked the “Notify New Users By Email” box, each newly added user will receive an email notification.
The email will provide details about their new role, including information about the person who granted the role and instructions on how to access the Google Analytics dashboard.

How to Delete Users From Google Analytics
The process of removing a user from Google Analytics is similar to adding one.
To delete a user from Google Analytics, follow these steps:
- Access your Google Analytics account and navigate to the “Admin” section.
- Within the Admin section, select one of the Access Management options. In most cases, “Account Access Management” is the recommended choice.
By following these steps, you can initiate the process of deleting a user from Google Analytics.

Conclusion
In conclusion, adding a user to Google Analytics is a straightforward process that grants individuals access to valuable insights and data about website performance.
By following the steps outlined in this article, you can easily navigate through the Admin panel, select the appropriate level (Account, Property, or View), and add users with specific roles and permissions.
Remember to exercise caution when assigning roles, granting access only to trusted individuals who require it for legitimate purposes. With the ability to customize user permissions and provide email notifications, Google Analytics ensures a secure and collaborative environment for effectively managing website analytics.
By leveraging this powerful tool, businesses can make data-driven decisions, optimize their websites, and drive growth in the digital landscape.
Google has many great free tools, but there are some you might want an alternative to, read this article about potential Gmail alternatives.
FAQ
Yes, you can add multiple users at once in Google Analytics by entering their email addresses separated by commas when prompted.
The roles available when adding a user in Google Analytics include Administrator, Editor, Analyst, Viewer, and None. Each role has specific permissions and access levels within the account.
Yes, you can manage users and apply data restrictions to hide sensitive information from specific users. This can be done during the process of adding a user or by modifying their permissions later on.
It’s important to grant access only to trusted individuals who require it for legitimate purposes. Additionally, regularly review and update user access permissions to ensure data security and compliance.
